
Mounting Board 2Picture____A space of approximately 1 1/4" is needed between the boards. Closer spacing may need a shield to keep adequate isolation between the boards. The spacers with female ends 1 15/16" long are the ones used to mount Board 2. They are screwed into the spacers holding Board 1 and screws (6-32) are used in these spacers to hold Board 2. As mentioned when Board 1 was mounted, it is very important that the spacers around the VFO have an excellent connection to the ground plane. 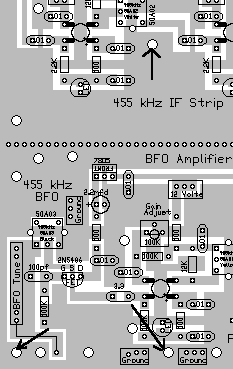 Arrows point to the location of the holes.
____The ground plane underneath the holes on Board 2 shown above must be sanded or lightly tinned to be sure of a good ground connection. Picture showing spacers coming from the VFO. ____Mount Board 2 into the male ends of the spacers coming up from Board 1.____Use 6-32 screws to secure the board on the spacers. |
|
See Making Loops for Connections on the Boards for making easy connections to the board for testing and completing the board. Three sets of loops are needed: Xtal Filter IN/Ground, 12 VOLTS/GROUND, and SPEAKER/Ground. ____Connect +12 Volts to the +12 Volt and Ground connections near the AGC Detector at the edge of the PCB. Picture____Be careful with polarity reversal. Use diode protection if a mistake might be made in connecting the board to 12 Volts. ____Use a 1 amp diode, 1N4001 or similar at the 12 volt main connection to prevent accidentally hooking up the receiver with reverse polarity. (This diode is not currently supplied with the kit.) The band end of the diode is connected to the 12 Volt connecion and the other end connected to the power supply. Second Mixer____Second Mixer: Both LEDs should be on.TroubleshootingCrystal Oscillator____Crystal Oscillator: With a finger over the lens on the Phototransistor, so that it receives no light, the LED marked 40/20 should be on. When light is put on the Phototransistor, the 30/17 LED should be on.____Measure, cut, (See Preparing the Heat Shrink Tubing) and install a piece of 3/16" black tubing (Bag 6) between the 30/17 IRED at the Crystal Filter on Board 1, and the Phototransistor at the Crystal Oscillator. Note: If a dim light hits this Phototransistor, both crystals at the oscillator can be active causing a very loud howl out of the speaker. TroubleshootingCrystal Oscillator Amplifier____Crystal Oscillator Amplifier: The LED should be on.Troubleshooting455 IF Strip____455 KHz IF Strip: All three LEDs on the IF strip should be on. At one of the AGC connections, use a wire with clip leads and connect the AGC to Ground.____The first two LEDs in the strip will turn off, the third one will remain on. ____Remove the wire after testing. TroubleshootingBFO Amplifier____455 KHz BFO Amplifier: The LED should be on. Turn the "Gain Adjust" pot clockwise at the amplifier and the LED should turn off.____Turn the "Gain Adjust" counter clockwise so the LED is turned back on. TroubleshootingAudio Pre-Amp/Audio Amplifier____Audio Pre-Amp/Audio Amplifier: Connect a speaker to the speaker terminals at the right of the TDA2002, near the edge of the PCB. ____Touch a finger to the input of the Audio Pre-Amp, at the 1.5K resistor, below the "10mfd Gain Adj" box. Hum from the 60 cycle house wiring should come out of the speaker. ____Touching the center connector of one of the 10mfd tantalums at the Bold "Audio Control" box will bypass the Audio Pre-Amp, and will also give a 60 cycle hum out of the speaker. If the 60 cycle hum test did not work at the 1.5K resistor, this test will isolate the problem circuit. Troubleshooting |
Send E-Mail || Amateur Radio Receivers || Electroluminescent Receiver || Back to Construction of the Kit || Back to Ham Radio Instructions for the Kit