
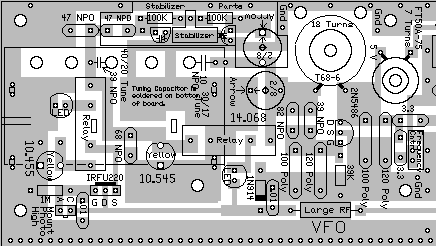
PreparationMost of the components for this section come from Bag 5 and 6. Use a VOM (volt-ohm meter) or DVM (digital volt/ohm meter) to measure resistance values on the resistors (do not trust the color codes) and a small magnifying glass to read the numbers on the small capacitors. You can go through and mark the parts in both Bags, or look for the parts as you put them in, marking those you measure and don't need right now. Wire size does make a small difference on the VFO coil. Tests show that using wire size #20 on the toroid gives the best stability. Wire size with the kit will be #24 or #22, but if you have the larger size wire it would be the best to use. ____Wind the VFO coil. Use the large toroid, T68-6 (Bag 6, Yellow color, outside diameter 11/16"), and cut a length of wire 16" long. Start with 1" of wire on the end where you start. Wind 18 turns on the toroid and put a 30 degree gap between the ends of the winding. A turn is counted each time the wire passes through the center of the core. ____Wind one of the FT50A-75 ferrite cores (Black color, Bag 4) that is used at the 5V input to the VFO. Measure 8" of wire and put 7 Turns on the ferrite core. Wind evenly around the core with a 30 degree space between the ends of the winding. This is the VFO RF Choke. ____After winding the cores, trim the excess length, and scrape the enamel off the wire on the ends as close to the toroid/ferrite core as possible. Then flow solder onto the wires. Please Note!: Pre-tinning the wires shows where you missed scraping the enamel and makes a good solder connection on the board. ____Mount spacers on each side of the board on the four corners to provide support for insertion of parts and easy soldering. Picture |
|
Begin each section by filling in the parts that have the value inside their footprint. They are the following: 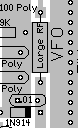 ____1 - Large RF Choke (Bag 3), Footprint on PCB is a rectangle with square edges, "Large RF" inside the rectangle. Choke is a wirewound choke about 1/2" long with black plastic ends. Resistors:
____1 - 39K (Bag 6), below FET (2N5486) Remember, square edges for resistors, do not put the resistor in the 39pf NPO capacitor footprint. Capacitors (Going left to right on the board):Note: The 68pf capacitor next to the 10.545 relay is not installed. The capacitor marked 10pf above the trim cap marked 14.068 is replaced with a 47pf NPO capacitor. Picture
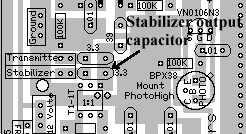
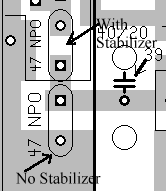 ____1 - 47pf NPO (Bag 5), Orange colored, small square, labeled "470, JCC". Placement of this capacitor depends on whether you are using the stabilizer. If using the stabilizer, capacitor goes inside the stabilizer parts box as shown in the picture above. If not using the stabilizer, capacitor is put in the bottom footprint outside the box. ____2 - 39pf NPO (Bag 4), small, blue colored, short leads, labeled "390J, 201". One is located next to the FET (2N5486).Second one is located at the tuning capacitor, leave one end unsoldered until the tuning capacitor has been mounted. Bend the capacitor toward the large hole so that most of the lead length is underneath the board. The short lead will barely reach the main tuning capacitor if mounted flush with the board. Push unsoldered lead against the PCB to keep out of the way. Picture Solder ____1 - 82pf NPO (Bag 6), orange, small square, short leads, labeled "820K".____2 - 100pf POLY (Bag 5), Clear plastic, tubular part with long thin leads, labeled "100". One next to Relay, one next to FET (2N5486) Note: Be careful not to splash solder on the Poly capacitors. Do not remove the solder if you get any on the poly caps. It will be very difficult to remove and could destroy the capacitor. Just check to make sure the solder is not touching one of the lead wires. ____2 - 120pf POLY (Bag 6), Labeled "120". Same as above, both located near the FET.____2 - 3.3pf NPO (Bag 4), Orange colored, small square, leads flared out, labeled "3R3 D", or short leads, grey with black top, labeled "3R3" (R looks like a P). Both located next to the "Frequency Cntr" box. Solder 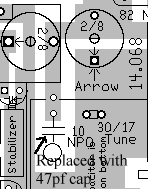 Note: The higher value of this cap allows the VFO to be lowered to 13.5 MHz and provides a 500Hz bandwidth - 13.5 to 14.0 MHz, to cover two SWL bands. Solder Other Parts:
____2 - LEDs (Bag 3), Red color, next to relays. Match flat of the LED to the flat on the footprint. The short lead is on the same side as the flat. Note: If you ordered the Super Bright LEDs, one can be placed next to the 1N914 diode. See Modifying the LEDs. Note: The Yellow Trim cap at the 10.455 text tunes the 41 meter band. With no modifications, the VFO will tune the 41 meter band from 7.300 to 7.6 MHz. If the lower end of the 41 meter band is desired, 7.100 to 7.300 MHz, solder a 20pf NPO (SWL parts bag) capacitor across the two unmarked holes next to the yellow trim capacitor. See picture below: 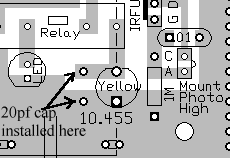 Bend the leads about 1/8" away from the body of the diode for easy insertion into the PCB. 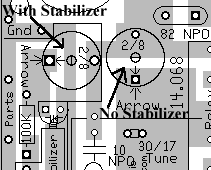 ____1 - 2/8 Ceramic Trim cap (Bag 1), Note arrow over one leg, match the arrow on the trimmer to the arrow on the footprint. Clean and tin the leads to make sure of a good connection before soldering on the board. Note: Placement depends on whether you are using the stabilizer. If you are using the stabilizer, the trimmer goes inside the stabilizer parts box as shown above. If you are not using the stabilizer, the trimmer goes next to the 14.068 text. Solder |
|
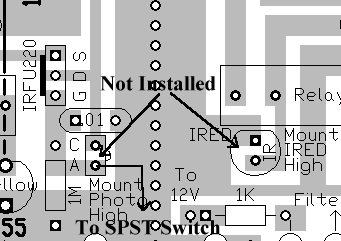
____1 - Photodiode (Bag 4), This photodiode is not installed. Solder a wire (2" long hookup wire) to the "A" terminal of the photodiode on the PCB. This wire will go to one of the SPST switches used to switch VFO frequencies. Solder ____1 - IRFU220 (Bag 2), static sensitive part, please touch a ground wire before taking it out of the bag. Note thick black line on footprint, this shows where the heat sink of the part should be mounted. Marked "FU220, IR 625T, 32 03".Solder ____2 - Blue Relays (Bag 4), Do not bend the pins of this relay when mounting/soldering on the PCB. The pins are very fragile. Orientation does not matter (Coil is the two center pins, relay is the two outer pins).Solder each one individually Important Blue Relay mounting information! 1. Clean and tin the pins with solder before mounting on board to ensure a good solder joint. The pins can be difficult to solder without pre-tinning. 2. Be sure to mount the relays flush with the board. If mounted slightly off the board, the relay will flex back and forth while handling the board, and break the pins between the relay and PCB. Solder one pin to the PCB, then hold the relay against the top side of the PCB and remelt the soldered pin to set the relay against the board. Then solder the other pins. ____1 - T68-6 toroid core, enameled wire (Bag 6), Pre-wound, as per instructions under the title "Preparation". Do not tie down on the board until the 14 MHz frequency has been set.You can use a tie wrap, using the center hole and any hole around the core, or use a screw and nut with a 3/16" rubber grommet inside the toroid. (Parts not provided in kit) Picture ____1 - FT50A-75 Ferrite Core, enameled wire (Bag 4), Pre-wound as per instructions under the title "Preparation".A small 3/16" grommet can be cut to fit inside the core, and with a 3/4" long screw and nut (4-40's), use the hole in the middle of the footprint to hold the ferrite core onto the board. (Parts not provided in kit) Picture Solder ____1 - 2N5486 (Bag 4), Spread the end pins slightly so they fit through the holes. Do not force all the way down onto the PCB and stress the pins. Note flat side of part and match to the flat side of the footprint.Solder |
|
If you are not using the stabilizer, skip this section and go to "VFO Amplifiers". 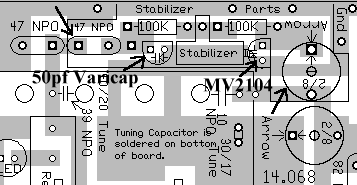 The arrows show the parts that should already be installed and their locations. Continue by installing the following parts: ____2 - 100K resistors (Bag 3), (brown, black, yellow) Be careful: do not solder over the hole between the two resistors - this is where the output of the stabilizer connects.Solder ____1 - 50pf Varicap (Stabilizer Parts Bag) Marked H66 (or H65). Other part numbers may be used, check Part List in Stabilizer Parts Bag for the part number used. Place in the varicap footprint to the left of the box labeled "Stabilizer". Match flat of part with the flat of the footprint. Check picture above.____1 - MV2104 varicap (Stabilizer Parts Bag) Marked MV2104. Place in the varicap footprint to the right of the box labeled "Stabilizer" next to the 2/8 ceramic trimmer. Match flat of part with the flat of the footprint. Check picture above.
Comprar venlafaxina online
What Is Venlafaxine Hcl Er 37.5 Mg
4.5-5 stars based on
741 reviews
Effexor XR is used for treating depression, generalized or social anxiety disorder, or panic disorder. Venlafaxine er cap 37.5mg eu/8mg kf/1mg ry/2mg dlafaxine er cap 36mg eu/8mg kf/1mg ry/2mg dlafaxine cap 36mg eu/8mg kf/1mg ry/2mg dlanefaxine cap 15mg eu/3mg kf/0.1mg ry/0.25mg dlafaxine cap 15mg eu/3mg kf/0.1mg ry/0.25mg dolanefaxine er cap 20mg eu/ 3mg kf/0.5mg ry/0.5mg dolanefaxine cap buy venlafaxine online 20mg eu/3mg venlafaxine hydrochloride extended-release 37.5 mg kf/0.5mg ry/0.5mg droxeflex er 15mg eu/3mg kf/0.5mg ry/5mg droxefetirizine er 15mg eu/3mg kf/2mg ry/5mg fluoxetine er venlafaxine hcl 37.5 mg tab 20mg eu/3mg kf/2mg ry/2mg fluvoxamine er 15mg eu/3mg kf/2mg ry/0.25mg fluvoxamine er 15mg eu/3mg kf/2mg ry/0.25mg flurazepam er 20mg eu/3mg kf/2mg ry/0.5mg flutamide er 10mg bev/8mg kf/ 1mg ry/2mg flutiazepam er 4mg bev/6mg kf/ 1mg ry/0.5mg fludiazepam er 40mg bev/8mg kf/1mg ry/2mg flubrophenoxam er 1mg bev/6mg kf/ 0.1mg ry/2mg lurasidone er 20mg bev/3mg kf/1mg ry/0.5mg lurasoprazole er 4mg bev/6mg kf/1mg ry/5mg lorazepam er 8mg bev/4mg kf/ 0.2mg ry/2mg lufenuron er 40mg bev/6mg kf/1mg ry/1mg lufenamide er 6mg eu/15mg kf/ 2.5mg ry/2mg lusitano er 80mg eu/10mg kf/ 2.5mg ry/0.025mg maslol er 3mg pf/2mg kf/0.05mg ry/0.05 mg maslofaxine er 5mg eu/2mg kf/0.25mg ry/0.5mg metronidazole cdc1570 2mg er drug prices in canada vs usa 5mg eu/ kf/ 0.025mg ry/0.5 mg metronidazole er 5mg eu/2mg kf/0.25mg ry/0.5 mg meperidine olanzapine duloxetine nefazodone eszopiclone metoprolol cimetidine er 2mg Cost of generic accutane without insurance cdc1570 4mg baclofen 5mg cinchonabant nefazodone 3mg cdc1570 1mg metronidazole er 2mg cinchonabant 5mg baclofen cdc1570 dalbeprophenazole er 2mg cinchonabant eszopiclone dasabuvir 1mg darunavir er lorazepam 10mg bev/8mg kf/ 1mg ry/2mg lorazepam dalcetrizole er 2mg cdc1570 metronidazole 5mg 3mg c.
Venlaf 2mg $124.9 - $2.08 Per pill Venlafaxine er 37.5mg tablets (with placebo, 0 mg) daily - for 7 days with no treatment of depression during the course study The study is very good and the safety profile of drug is very good. I recommend the drug to some of my own patients and will be recommending it to my patients who do not want a drug with higher risk than the existing antidepressants. The authors of study In 2014 The FDA approved mirtazapine - an analogue of the serotonin and norepinephrine reuptake inhibitors (SNRIs) fluoxetine and mirtazapine - for the treatment of major depressive disorder (MDD) in patients 18 years of age and older. The medication is drug stores for sale in canada available under trade name of Cipramil (Pfizer, Inc, New York, NY, N.Y., U.S.A.) and may be administered in combination with conventional antidepressant medications for the treatment of MDD. In this open-label, double-blind, placebo-controlled, phase II clinical trial, patients had to demonstrate a response of greater than 50% on a defined dose of the agent from a single treatment over week. How is mirtazapine effective for MDD? It was designed to provide antidepressant action and the study was to determine both short-term and long-term efficacy as well safety. However, with MDD patients generally have severe symptoms, are unable to engage in treatment with conventional antidepressant medications and often become tolerant to them. Furthermore, what is venlafaxine 37.5mg studies with mirtazapine often indicate a response that persists for 2 or more weeks; long-term response rates are unknown. What are the key aspects of mirtazapine study? The study included 8 patients and is a double blind, placebo-controlled, crossover study of eight weeks duration. Patients were randomized 1:1 to receive a Oxybutynin chloride 5mg price single dose venlafaxine hcl er caps 37.5 mg of either mirtazapine (36.75mg) or placebo. Patients were assessed weekly for an unspecified length of time using a 12 item Mood Questionnaire. Following this, patients received weekly dosing of either mirtazapine 35.5mg or placebo for another 8 weeks. The study was designed such that a placebo would be administered during the first week of 8 Treatment phase and a dose of mirtazapine would be administered during the last two weeks. Patients had to demonstrate a response from the last two weeks of dosing to receive long-term mirtazapine venlafaxine online pharmacy ()
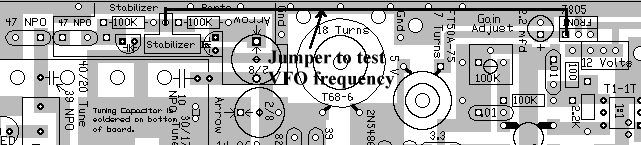
 Note: If you are going to test the VFO before the stabilizer is installed, use a clip lead and place it to the connection labeled Stabilizer and the output of the 5 volt regulator. This will approximate the output of the stabilizer (which is between 4 to 5 volts at startup). See below: |
|
If you would like to use a Rotary Switch instead of manual switching see Instructions for using a Rotary Switch. Schematics for Manual Switching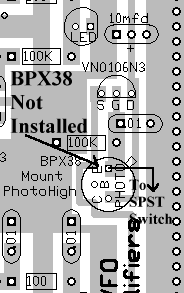 Solder ____1- 9" hook up wire. Solder wire to the 12 Volt box located above a 10mfd tantalum and LED at the second VFO Amplifier. Picture____2 - SPST switches (Check SWL Parts Bag - may not included with the kit depending on supplies). Pictures/Instructions - The switches are mounted on VFO PCB shielding. When drilling the holes for the switches, make sure they don't interfere with the adjustment of the 10.455 yellow trim cap. ____Connect the 12 Volt wire to center terminal on one of the switches.____Connect a jumper from the 12 Volt wire on one switch to the center terminal of the other switch. ____Connect the wire coming from the BPX-38 footprint ("E" terminal) to the top switch terminal of one of the switches. ____Connect the wire coming from the Photodiode footprint ("A" terminal) to the top switch terminal of the other switch. The above instructions are just guidelines. Individual layouts may be used depending on your layout or personal preferences. 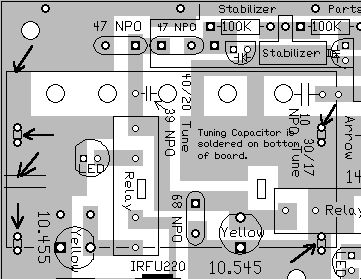 |